As promised last week, here is the recipe for the aprons. Please remember, I am not a pattern writer. I have drawn diagrams to the best of my abilities, and hopefully, as there are a LOT of photo's you will be able to follow along. The measurements on the chart are a starting point only. It may be wise to make a mock up first (top bit only), then you can determine where darts need to go and how big a dart is needed. I used drill fabric for the black and pink aprons, and the floral apron is a poplin type fabric with a poplin lining. The drill aprons are finished using a facing, the floral is a full lining. Use of a lining fabric is recommended if the main fabric is a little thin.
I purchased 1 1/2 metres of fabric (59 inches) at 112 wide. This makes an apron 1 metre long (40 inches). For the lined apron, I also purchased 1.10 metres/43 inches of lining fabric. There were bits left over, but I wanted to make sure I had enough as I was working the aprons out as I went (and in the case of the floral apron I used all the floral up due to an "unfortunate incident"). You will also need 3 - 4 metres (final length is personal preference, I like to tie mine around the front) of good quality herringbone tape - 1 inch wide (2.5cm). Some are better than others, one of the ones I purchased had absolutely no body at all so I ended up making a strap. Okay, here we go....

Fold your fabric in half length ways. I gave mine a light press. Trim top to give a straight edge. Measure desired length and cut. At the top edge, make a mark - 1/2 the width of your above the bust measurement. (On this sample it was 7 1/2 inches/19cm). On the outside edge (length) measure down 12 to 14 inches (if you are high waisted 12 inches/30cm will probably do). Draw a gentle curve between these two points. The remaining fabric will be for the pocket and the facing. Keep it folded.
This is the "armhole" for want of a better description. If you want to vary the neckline with a "sweetheart" shape or any other shape that takes you fancy, you can draw this in and cut out also.
Next, we have to draw out a facing. This needs to be drawn on the fold (neck edge). I used the apron piece I had just cut, as my pattern for this piece. Trace the design and then across the neck edge, make a mark 3 inches/8cm down. On the armhole edge, the facing doesn't quite have to be as deep - 2 inches/5cm will be sufficient. Do place your drawing as close to the top of the fabric as possible to allow the waste to be used for the pocket.
Use your tape measure to mark a cutting guide. Here I am marking the facing at two inches and will use these marks as a cutting guide.
Cut the facing out. On the wrong side of the apron piece and the facing, mark your dart position. As a starting point, try the dart at 3 1/2inches/9cm in from the outside (armhole) edge. Adjust as necessary. I drew the straight line (dart centre) 3 inches /7.5cm long and then placed a mark at 1/2inch /1.5cm on either side of this line. I then drew a line down to the point - this gives you the centre of the dart and a stitching line.
You will notice on the facing for the pink apron, I didn't make the neckline facing area as deep as I have stated in the above instructions. This means that the dart point on the facing will not be able to be completed. This works fine, just draw the lines using an imaginary finishing point and then sew accordingly.
When pinning the two pieces together, make sure that one dart faces one way, and the other faces in the opposite direction so they butt up to each other nicely.
Sewing order is important in the project, for ease of finishing. Pin the facing - neck edge to neck edge - be very careful of the armhole areas as they are now bias edges - so treat them kindly! Make a mark (or pin) as follows: Armhole edge - mark at 6/8 inch, from this mark, make another mark at 1 1/4 inches, this is for the tape/strap slot. Do the same on the other side. You will now stitch a short seam, leave a gap of 1 1/4 inches, sew to the next mark, stop, leave a gap of 1 1/4 inches and then sew the remaining 6/8 inch measurement. With the wrong side facing up, lightly press the seam open.
You are now going to do a little bit of top stitching around the holes you have just made.
Now fold back, right sides facing and sew the rest of the facing on to the apron piece.
If you have done a sweetheart neckline, you will need to clip the curves. Turn right side out and gently press, making sure to roll the facing slightly to the back to give a neat finish on the front. Using a small zigzag stitch, neaten the edge of the facing.
REMEMBER follow the order of stitching, for ease of construction!
Now we will approach the side seams. These were completed by folding over once and then folding a second time. I used the glue stick to keep them in place, (pins will be sufficient) and gave a light press. You can see from the photo that this seam incorporates the facing.
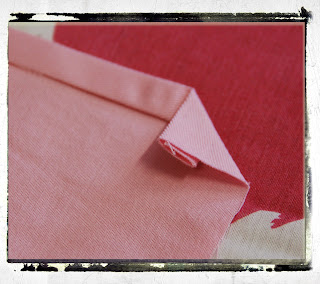
Next is the hem. You can see from the photos how this is folded.
First fold.
Second fold - nice neat corner.
Now top stitch in order - side, bottom, side.
Now we have to take care of the armhole area. Press the facing into postion and pin the facing down to stop any puckers. First top stitch the outside edge. Use the slits you made on the top edge as your guide. Sew each of the two outside edges first. Next, using the quilting guide, you are going to sew the channel for the tape. To set the guide, line up your needle with the edge of the slit (it doesn't have to be bang on it - to the side slightly is fine) and adjust the guide until it sits on the top stitching line you have just sewn.
Sew the two channels. You can now thread your tape. Start on the side, come up through the neck slit, go back in through the other neck slit and come out back on the side. Try the apron on before adding pockets. Mark where the pockets should be placed.
The pockets are made from the leftovers. I had enough left to make one piece for the front of the pocket, and joined the two pieces from the armhole scraps for the lining. The best way to sew these is to leave a gap in the lining pieces and press open the seam. With right sides together, sew all around the pocket shape in one piece and use the gap in the stitching to turn through. This makes for a neater edge. Slip stitch the seam together, press and top stitch the top edge. Find the centre of your apron and the centre of the pocket, and sew in place. My pocket is a rectangle, with a centre seam forming two pockets.
FULLY LINED APRON
For the fully lined apron, you will need to cut two pieces, one main and one lining fabric. The darts and neckline will be cut as above. Again, mark your darts and pin and check that they fall well. Adjust if necessary, and make the same adjustments to both pieces.
Sew darts and press in opposite directions as per the facing style. When sewing the darts, and to get a good sharp point, try the following - start at the widest part of the dart, with normal stitch length. As you get closer to the point, start reducing your stitch length until the last 1/4 inch or sew your stitch length is 0.5. Run off the fabric - don't back stitch, leave a small tail, done!
There is a slight change of order, when doing the fully lined version of the apron. Sew the neck edge first, leaving the holes for the tape/strap to feed through. Press open as before and top stitch.
Now you are going to carry out the same procedure for the sides, to make a slot for tape/strap. This time, sew the short line of stitching, leave the same width gap and then stitch for 3 inches down the side of the apron. This will make your top stitching around the hole easy to manage. Once this step has been completed, you can sew the armhole seams on both sides. Go back and finish sewing the side seams, top to bottom. Leave the hem open. Turn the apron right sides out. Carefully push corners out (remember to clip). Press. As before, top stitch the two armhole seams first, and make the channel. Sew across the neck edge. Then sew down the sides, taking care not to sew over the tape slits!!
Turn up the hem, I folded twice to get a neat edge, and top stitch into place.
Thread the strap through as before, try on and mark for pockets if desired. I attached the pocket, sewing through both layers.
I hope the above instructions are clear and easy to follow, any questions, just ask. I look forward to seeing some aprons in the coming weeks.
Bye for now. Sue xxx


