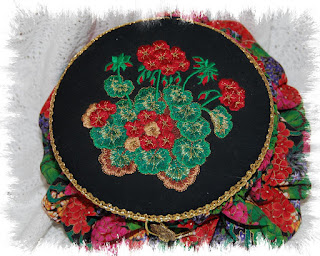
Today's little "how to" are these trinket/jewellery or sewing boxes. They are not difficult to make so don't be put off by the amount of photo's it took to cover all the elements.
But what will I need?, I hear you ask:
Some fabric (naturally) - You will need a strip of fabric - the width of the fabric (42 - 44 inches) x 8 1/2 inches wide, plus enough to cut two circles for the lid and the base.
Lining Fabric - width of fabric x 6 1/2 inches plus enough for two circles for the lid lining and base lining.
An embroidery hoop - the boxes above have been made with a set of hoops 6 inches in diameter. Use the cheap hoop that is made from lightweight wood or balsa wood. They are usually only a couple of dollars each.
Cardboard - cut 4 circles using the embroidery hoop as a template.
I used a dress making fabric for the first two boxes - both were a little wider than cotton patchwork fabric. The box with the separate lid is lined with a velour fabric. Don't think this is the only size you can make, the hoops come in many sizes and there are even some that are an oval shape. If using other sizes, just make sure that the amount of fabric is adjusted to give a full and voluptuous (for want of a better word) look. You can also make the boxes as deep or shallow as you like.
With right sides together, sew the main fabric and the lining fabric together lengthwise. Press the seam allowance towards the lining side. Top stitch close to the seam on the lining side - This helps keep everything in place.
Now we are going to sew this fabric piece into a tube. Place a pin at the seam.
From the outside edge of the lining, sew a seam about two inches long. Repeat on the main fabric. Carefully press the seam open, keeping the seam allowance straight in the area you haven't stitched.
Now fold the tube in half - there should be some of the main fabric in the half with the lining fabric. Measure the thickness of the embroidery hoop. Top stitch on the folded edge (not right on the edge) leaving enough room for the embroidery hoop to fit through comfortably.
Pin the bottom edge so the lining and the main fabric a together. Make sure there are no twists. Run two rows of gathering stitches around the bottom edge.
Before drawing up, place pins at either 4 points or 8 points along the bottom to use as markers when the bases are attached. Prepare the embroidery hoop.
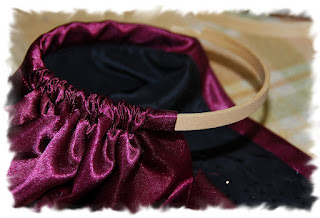
Cheaper hoops are usually made from some type of balsa wood and are therefore easy to cut. I was able to use both parts of the hoop for the purpose of making these boxes. The hoop with the hardware on, I used a screwdriver to prise the metal pieces off. (This is the one I used in this demo) The other hoop could be easily cut with a craft knife or shears.
Thread the fabric on to the embroidery hoop.
To join the hoop, I used a craft glue and some duct tape (not terribly antiquey but perfect for the job!). Cut a narrow piece of duct tape. Apply glue to the two edges of the hoop. Use the first piece of tape to join the two hoop edges. Cut another piece of duct tape and wrap this area of the hoop. Don't make it too thick.
Distribute the fabric evenly around the hoop. You can slip stitch this seam together now if you wish.
Make the base pieces. There are two pieces for the base - one is covered with the lining fabric and one will be covered with the main fabric.
Once the wadding has been put into place, each circle will now be covered by the chosen fabric. Use either glue to hold the fabric in place or stitch with a running stitch around the edge and draw up the fabric around the cardboard. Eliminate any wrinkles around the edges of both pieces.
Now start gathering the fabric attached to the hoop. You are going to sew the lining base piece in first.
Once the fabric is gathered, I used pins pushed into the cardboard base to hold the pieces together.
When you are happy with how the base looks, check how the sides look and adjust the fabric folds. I stood a jar in the centre and lifted the box base up and fiddled until I was happy with the distribution of fabric.
Thread a needle with the lining colour and using a ladder stitch, go around the base and stitch the base to the "walls". I went around twice, the second time just neatened the look of the base and took care of any gaps where the contents of the box could hide!
Here is the base all sewn in.
Now you are going to attach the outside base. Again this is sewn into place with ladder stitch and again I went around the base twice. The first round making sure all the folds were evenly placed and the second time to pull the sides and base together.
Now you need to make the lid. This particular box has the lid attached with a hinge. I had a nice lace that suited the task so used that. If you wish to use fabric for the hinge, make a tube of fabric and use.
One piece of cardboard will be the top of the lid, the second piece is for the inside of the lid. Cover both pieces in the selected fabric as for the bases. This time you are going to stitch these two fabric covered pieces of cardboard together.
The box lid has been decorated with a piece of lace and some Swarovski crystals. The edge of the lid will need to be covered with a suitable trim. I used black Maribou. Use whatever suits the theme.
If you can't find a suitable button to close the box with, you may be able to see on the box below, that I made a covered button and then attached some crystals to add a bit more sparkle! I do like a bit of sparkle!
To make the loop for the button, I used the some embroidery threads (25 strands) I simple pulled them off the reel about 20 inches long and then twisted them together, tie a knot and cut the tails and hey presto, a button carrier with a tassel.
This is the top of the box with the loose lid. To keep the lid in place I covered a third piece of cardboard with a few layers of wadding in different sizes. This piece of cardboard was smaller. The extra padding keeps the lid in place.
So there you have it. Antique style with a modern twist. Any questions, feel free to contact me.
Sue xxx


No comments:
Post a Comment
I would love to hear from you, just so I know I am not talking to myself - the cat is tired and so is the dog!