
The embroidery consisted of two designs. One a large row of tulips, and the other two thirds of the pattern repeat, single tulips, some facing left, some right.


As the bag was only going to be small enough to hold a phone and a lipstick, I had to work a way around getting the most from the two versions of embroidery. With scissors in hand I cut five of the small tulips and pieced them together to make the front. As the last person to cut the fabric hadn't left any fabric directly under the tulips, I decided the best way to approach the placement was to have the smaller tulips all at different heights.


For the back I used the larger piece of embroidery.

The flap of the bag has a single motif on both the front and the back.

To keep the brides treasures secure, the purse has a zipper under the flap. I attached three charms to the flap, this will give enough weight to keep the flap down. The charms are a bird, a Swarovski Crystal Heart and a silver heart.


And do she doesn't forget who she is, I put the brides first initial on the lining as well as the date of the nuptials.

For the strap I used a silver chain. The easiest way I could think of to make the strap simple to remove and not have bulky fittings was to use two sets of toggle connectors (the type with the "T" bar that slips through a ring). I stitched the rings to the purse and attached a "T" to each end of the chain. The weight of the purse will keep them all in place.
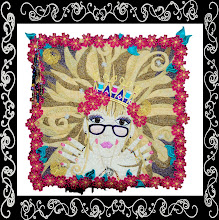
Our quilting group is having a Portrait Challenge. The plan being that these will be on display at our local library mid-year. I finally made a start on mine last week. Here she is - with some hair.

My piece is called "The Queen of Over Embellishment". I have taken liberties such as removing wrinkles and may have beautiful nails instead of the split brittle manky ones I actually own! I spent a lot of time with her on Saturday and she now has a lot more hair, and facial features. My friend Liz of Teddlywinks fame has been getting I Phone photo's periodically - her husband wanted to know when I had had collagen injections in my lips. Artistic licence David, artistic licence!!
NOW - ON TO MAKING FREESTANDING EMBROIDERIES - PART 2
In my previous post, I demonstrated making free standing embroideries using a candle. This method is great for large, simple designs. For smaller more delicate designs, I use a wood stencilling tool or a wood burner as they are sometimes known as well. These are a very handy tool to have in the supply cupboard.
This method is very straight forward, so straightforward there are only 4 pictures. I think they cover technique, if not, drop me a note and ask questions.
Embroidery is done on water soluble material and organza. The designs should be embroidered and then the stabilizer removed. Some stabilizers need to be soaked to get rid of them. Trim the excess fabric away from the design, leaving enough to keep a grip if necessary. I use a ceramic tile as my base for the cutting.
The burning tools usually come with a stand. Use it!! They reach very high temperatures. Make sure your work area is clear and well ventilated. Have a wet cloth on hand for periodic cleaning of the tip. The burners come with a number of different tips. For this exercise, I used a very fine point. (I always use a very fine point, but by all means experiment with some of the others). DON'T CHANGE TIPS whilst the burner is on.
In the first picture, you can see a butterfly embroidered on to organza. Because this design was not too dense, I used two layers of organza and no stabilizer. See what works for you.

First cut - like a hot knife through butter!


The finished cut out. Because of the fine tip, I could even get in between the antennae. Any tiny clumpy bits (that is a technical term) can be removed carefully with a small pair of scissors. Butterfly ready to applique in place.

Just because we haven't had any O'Reilly love here for a couple of weeks. Here he is with Harv the cat - smooching/tasting.

 Ooh and my Australia Day dessert - some weeks ago now - mini Pavlovas with a green and gold theme - mango and kiwi fruit floating in raspberry sauce.

Just because we haven't had any O'Reilly love here for a couple of weeks. Here he is with Harv the cat - smooching/tasting.


Bye for now. Sue xxx

 Quilter Blogs & Store Search
Sue, the purse you've made for the bride-to-be is THE most beautiful gift your neighbour could possibly give. It is perfection; made me tear up a bit! (I am rather partial to tulips, and am prone to being overly sentimental, so you hit it out of the park with this creation!)
ReplyDeleteThanks Christine, I was feeling a little nervous when I took it to her yesterday afternoon. I hope the bride likes it, I don't think she will get to see it till Saturday.
ReplyDeleteOh Sue, Caz's purse is absolutely beautiful. Great job, as always.
ReplyDelete